
You’ve sent out your first surveys and the feedback is rolling in — fantastic! Now it’s time to close the loop by replying to your customers’ survey responses.
To navigate to the Responses Page, click the 💬 Speech Bubble icon in the navigation bar on the left-hand side of your screen.

📊 Overview of the Responses Page
The Responses Page has two main components:
-
a. Header Section — contains filters and search options
-
b. Individual Responses — displays incoming feedback and actions you can take
Let’s walk through each section in detail.
🧭 a. Header and Filters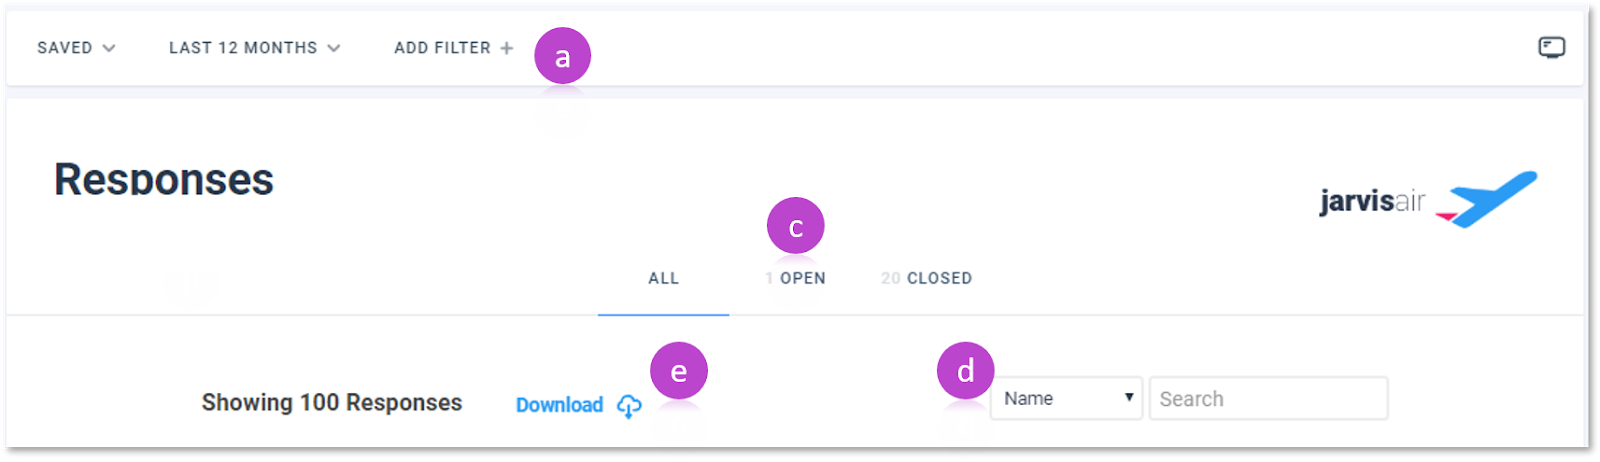
The top section of the Responses Page allows you to filter, search, and download your survey responses.
🔎 Filters (a)
At the very top is the Filters Bar, identical to the one used on the Dashboard. You can:
-
Filter by timeframe using the middle dropdown
-
Add filters for custom data via + Add Filter
-
Apply saved filters from the Saved dropdown
🗂️ Cases Tab (c)
If you're using Cases to track feedback resolution, these tabs let you view Open, Closed, or All cases. If your team isn’t using case tracking, you can ignore this feature.
🔍 Search Function (d)
Use the Search Bar to narrow responses by name, email, or other fields. The displayed NPS score (b) updates based on the filtered search results.
📥 Results Total and Download Link (e)
After searching or filtering, you’ll see the number of matching responses. Click Download to export all or only the filtered responses as a CSV.
📬 b. Individual Responses
Below the header, each incoming response is displayed as an individual card. Here's what you'll find in each response entry:
🟢🔴 NPS Score and Contact Info (a & b)
Each response card shows:
-
The NPS score, color-coded (green = Promoter, gray = Passive, red = Detractor)
-
The contact’s name, email, and other metadata
-
CRM or social profile icons (if integrations are enabled)
-
Open/Closed case status (if using Case Management)
💬 Contact Comment (c)
If a contact left a comment, it will be visible here. Click it to open the Response Chat Window and start your reply. If no comment was left, the “No Comment” text is clickable as well.
🧾 Additional Data (d)
Custom data fields for the contact appear under their comment. Hover over any value to see the associated field name. This section also shows any Workflows triggered for the response, marked by a ⚡ lightning bolt.
📨 Communication Snippets (e)
Below the custom data, you’ll see icons for each interaction with this response:
-
⚡ Purple lightning = triggered workflow
-
📩 Blue = outgoing email
-
📨 Gray = incoming email
-
📝 Yellow = internal note
Click any of these to reopen the full conversation in the chat window.
🛠️ Actions (f)
Use the buttons along the bottom of each response card to:
-
Send a reply
-
Add an internal note
-
Publish a testimonial request
-
Trigger a workflow
Click the three dots menu to access additional actions, such as editing or deleting the response. Edited responses will show an internal note outlining the changes.
⚠️ Note: Workflows and reply templates triggered here will send immediately and cannot be undone.
🙋 Need Help?
Have questions about working with responses or triggering workflows? Click the chat bubble in the bottom-right of your screen or email us at support@asknice.ly — we’re always happy to assist!